Putting Stats

Let’s take a look at putting starting from the hole and going backwards.   What is the average distance on the PGA tour for them to have a 50/50 chance to 1 putt?  If you said 8′ you are correct. We will use Mark Broadie’s stats for a lot of this from his book Every Shot Counts.  Take a look at the below insert I pulled from online.  There are 3 keys to putting: Green Reading, Speed Control, and Start Line.

large.table-3-10.png.8a9d136a729f97366df8e350c5ee1fc6

Short Putts: These are more on picking the right read and start line.  A tour pro has a 50% chance from 8′ but that same percentage is found at 5′ for 90’s golfer.  From those distances and moving out the percentages drop dramatically. Inside 20′ for the season a tour player must average a conversion rate of about 60% to keep their card.  That means for every putt from 1″-20′ for the season they holed out 6 of 10.  The average golfer expects to make a lot more than that and set their expectations too high and try to force the makes.  Keep track of how many putts you miss inside 6′.  When you work on the putting green work on making these putts.

Mid Range Putts: Will make some and miss some so expect to 2 putt often.  Goal is to not 3 putt from 6′-20′.  I do not recommend working on this area for the average golfer.  For competitive golfers they need to work on their conversion rates from in side 20′.

Long Putts:  The main key for these are picking the right read and then getting the speed to match.  For the average golfer this is outside 20′ and for the pro’s 40′.  The goal from 20′ and out is to stop the ball at the hole.  Other than green reading and short putting practice I recommend players to spend most of their time in this zone from 20-50′.  A good putt is 10% of the distance so for a 50′ putt within 5′ is good.  Now when you are training, train harder so you can play easier.  A great game/challenge is to set up 2 tees or coins 3′ apart as the goal and drop a ball starting at 20′ and another one ever 5′ going out to 40″+.  Start at 20′ and if you roll it in the 3′ zone move back 5′ and putt from there until you stop it in and repeat the process out to your stopping distance or for 5 minutes of game time.  Do this up and down hill where down hill will be harder to control the speed.  Lastly play 9 holes from 30′-50′ with different starting spots to different holes with the goal to finish with 18 strokes.  Not trying to make them from that distance but stop it at the hole and knock in the next putt.

For green reading I would recommend seeing your nearest AimPoint Certified coach and go through an Express Level 1&2 class.  If you are picking the wrong spots then speed control gets difficult.  Under reading the putt tends to get a ball traveling too fast towards the hole to keep the ball from dropping below the hole which results in a ball that finishes well past the hole.

AimPoint Certified Black.transparent.gif

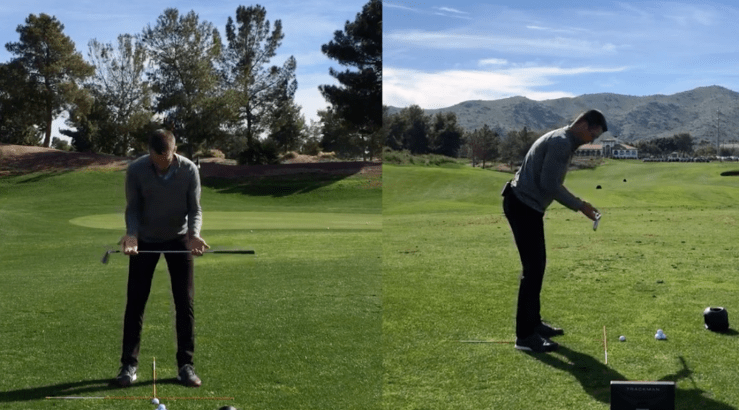
The 3rd area of putting is start line.  Best practice here is to putt down a 1″ wide yard stick.  Set the yard stick so the end is going right into the middle of a hole on a straight uphill putt.  Roll in 5-10 balls in a row depending on your skill level then move on.  If you are a competitive golfer you will have more time to spend in all areas of putting.  Most golfers need to use their time wisely and spending 15-20 minutes during each practice session on their putting.  This is an area they can improve quickly and anyone can do it.

Take Dead Aim?

Let’s take a look at a 165 shot to a left pin.  This could be any approach shot into the green but for this example it is a par 3.  What would you hit and where would you aim?

Screen Shot 2019-04-21 at 4.45.08 PM.png

Now let’s take a look at a Scratch Golfer 7iron and 15 HDCP 8iron dispersion patterns.  They were asked to hit 20 balls towards a target and we used TrackMan recored the landing spots for all.  The Scratch Golfer’s circle was 18 yards deep by 26 yards wide while the 15 HDCP circle was 43 yards wide by 46 yards deep.  Also if you take a look the center of the balls is not exactly on the 0 line so I added a red dot for the middle of the dispersion pattern.  Golfers are firing shotguns not sniper rifles.  The better the ball striker and shorter the club the tighter the circle.  Higher the HDCP and longer the clubs get the bigger the circles get.

Untitled.jpg

Now that you are armed with this info would you still aim where you picked at the beginning?  A lot of golfers see the flag and think that is the target.  Let’s look at what would happen if these golfers were to aim for the pin and say their yardages were exactly the yardage as the shots above.  You can see the scratch golfer has 1/3 or more of their circle off the green and the 15 HDCP golfer has 1/2 or more of their circle off the green.  That is a lot of the circle in tough positions to chip from for an up and down attempt.

deadaim.jpg

That might be interesting to see for the first time.  Only issue with that example is a lot of golfers that visit with me do not know their average carry number.  They like to use the solid struck shots and think that that is the number to use (represented below with the green dot).  Below I moved the dispersion pattern down to where golfers think their ball will carry all the time.  They do not take into account a miss hit which results in shorter shots.   Most golfers will not hit it much further than their normal clean strike unless they catch a flyer (usually form the rough or landing the club slightly behind and getting a little debris between ball and club) but they will miss hit their clubs resulting in shorter carries.  With this now more of the circle is off the green for both golfers.

bestball.jpg

Now let’s take a look at a good aim spot for these same dispersion patterns.  Below I moved the Scratch Golfers aim spot to the center of the green and 5 yards deeper where the 15 HDCP pattern was moved more dead center of the green or slightly away from the trouble.  Now if you look at the circles and not just the dots there is going to be the same amount covering the green around the pin but now 85% of the circle is on the green.  With this concept when the scratch golfer misses the green now they have an easier chip to save their par vs the short sided bunker shot probability.  The 15 HDCP golfer might flush it to the back of the green or miss hit it to the middle but the dreaded ones they don’t think about will be ok.

bestball.jpg

This takes patience and discipline to play golf like this and waiting out the odds for the ball to land where a flag happens to be close by.  The higher the handicapper the more variance they have.  Best bet for them is to hit the middle of the green yardage if they know their average carry or even back edge club if they play for their best balls in order for their scatter pattern lands over the green.  Then putt to wherever the pin happens to be.

As the ball striking improves the back to front distance dispersion shrinks dramatically but the side to side reduces at a different rate.  For that player they could have more options of pulling a club that would land in the first 1/3, middle 1/3, or back 1/3 of the green depending on if the flag is front, middle, or back.  The back one they do need to be careful of not hitting it over the green and having a tough shot.

In summary if there is a hazard aim away form it by either shifting your target left/right or distance short/long to avoid it.  You are waiting out the variances for that ball that happens to land where a pin happens to be.  Take a look at the image below where your ball could be any one of those dots inside  your dispersion pattern and putting to any one of those pins depending where it was at.  This is how you lower your HDCP over time.

all.jpg

With a larger pattern (longer the club) imagine that the pin is not there and get your ball on the green.  It is easier to putt than chip and easier to chip than pitch.  Who knows maybe where one of the dots lands there happens to be a hole close by.

noflag

With a tighter pattern you have options but remember the flag is not your target.  Here is the same pattern for the front, middle, and back and you will notice the black aim line moves around on this green for the most green coverage and trouble avoidance.

blue

IF YOU WATCH GOLF REMEMBER THAT IS USUALLY THE HIGHLIGHT REALS OF GOOD SHOTS OUT OF THE FIELD OR SOMEONE THAT IS FIRING ON ALL CYLINDERS FOR A SHORT TIME AND THEIR DISPERSION PATTERNS HAVE GOTTEN SMALLER.  Also remember these players are the best in the world! This might happen for a few holes, day, or more but if you pay attention closely their scores have swings in them as well.  For more of an in-depth look at this there is a great system created by Scott Fawcett called Decade.  It covers expectations, approach shots, trouble shots, and driving decisions.

Arc Height

Arc height is an important skill to develop in the full swing and wedge game.  The reason is you can have good or poor technique but if you can control the Arc Height variable you can have a functional result.  This skill combined with the low point is also valuable in the full swing.

First let’s address what arc height is.  Arc Height is where the swing changes from going down on the circle to up.  That point is shown below at the black line.  I want to thank Adam Young Golf for the great graphics I got off his YouTube Channel. Also Click Here to go to his site and find out more info on The Strike Plan and NGL programs he offers.

Screen Shot 2019-03-16 at 3.13.43 PM.png

In the above image the correct height will collect the ball, brush the dirt in front, and start to change direction after the ball.  If that arc is lower like the lower arc above you will see that the impact where the star is moves back and the arc goes more into the ground.  Below is an iron strike off the grass.  The club first touches the blades of the grass at the furthest left arrow, continues down to the middle arrow, then comes above the blades of grass at the last arrow on the right.  In this scenario if the circle stayed consistent and the arc was moved 2″ lower the contact would enter further back and be traveling too far under the ball resulting in a heavy shot.

Screen Shot 2019-03-16 at 3.15.03 PM.png

Here is a visual of a club traveling too low.  Put the ball on a tee to see what would happen if there was no ground under the ball.  Imagine the ball is sitting on the ground and the ground is the black alignment rod.  In this scenario the club has came into first contact where the red arrow is then continues down to the bottom of the tee.  If there was actual ground here the club would crash into it and stop or bounce out.

Screen Shot 2019-03-16 at 3.15.52 PM.png

Below is an image of an arc height that is too high.  You can see that the leading edge of the club collided with the middle of the ball.  The causes the ball to go straight forward instead of letting the loft project the ball into the air.  Higher up than the equator then it will project the ball down into the ground.

Screen Shot 2019-03-16 at 3.10.59 PM.png

Here is a good arc height and low point control added together.you can see the club clipped the tee and was at the lowest point where the red arrow is at.  The club collided into the ball and was a center strike which projected the ball upwards.

Screen Shot 2019-03-16 at 3.17.51 PM.png

Now let’s look at a wedge.  If you can control how deep under the ball the club travels your low point can be at or around the ball as long as the club is not traveling down too steep and for too long.  A good drill for arc height control is to place the ball on a tee and have the tee 2-5mm above the turf.  The goal is to clip the tee and avoid the turf.  When you can do that move the ball onto the turf and have the same depth under the ball.

Here are 3 scenarios showing how depth control works in the short game area and having a wide margin of error is beneficial.  You can land the club a few inches behind the ball, at the ball, or slightly infront and have functional shots for all.  The launch, contact, and spin will all be different but results acceptable.

Scenario 1 Low point at the ball and good height control.  With this if you have the leading edge below the arc (too much shaft lean) the sharp edge will catch the ground and dig.  Also if you have too much bounce the back of the club can hit the ground and cause the leading edge to be turned into the ground and catch the leading edge.  Bounce effects how the club interacts with the turf so get fit!!

Screen Shot 2019-03-16 at 3.53.48 PM.png

Scenario 2 Low point behind the ball and good height control.  Club will slide across the ground and project the ball up.

Screen Shot 2019-03-16 at 3.57.19 PM.png

Scenario 3 Low point is in front of the ball and good height control.

Screen Shot 2019-03-16 at 3.57.40 PM.png

Can see the leading edge will travel below the equator in each scenario and project the ball upwards.

Arc Height Drill
Good Strike Clip
Arc Height too high, Thin Shot Clip
Arc Height too low, Fat Shot Clip
Thin/Fat are sometimes the same thing – Video
Good Low Point, matching bounce, proper shaft lean – Chipping off a tight lie video

Backswing Drill: Medicine Ball

Would like to share with you a good drill for the backswing.  This uses a medicine ball or weighted object to give you the feeling of what the body should be doing to move the weight or club back and through in a golf swing.  For the YouTube video link Click Here.

Step 1:  Put the weighted object in front of you with bent arms.  4-8 pounds is all you need.  The weight is there to give you a sensation not a workout.

Screen Shot 2019-03-16 at 4.22.30 PM.png

Step 2:  Turn the weight into your backswing.  As you can see I kept the weight in front of the chest and kept the arms in very similar positions as they were at setup.  It was moved back with the body.

Screen Shot 2019-03-16 at 4.22.21 PM.png

We do not want to see the hips sliding over the rail foot like below.  As you can see that just moves the weight side to side instead of in a circle.  Could do this with the body and pull my right elbow back but remember arms are trying to stay in the same position as setup.

Screen Shot 2019-03-16 at 4.22.43 PM.png

Step 3: From the backswing position rotate onto the lead foot and support the weight out in front of the body.  You will learn how to push the hips forward and keep the chest back to counter balance the weight as it is out in front of the lead foot.  Also notice the trail toe is in the ground and you can see the bottom of the shoe from down the line.

Screen Shot 2019-03-16 at 4.22.51 PM.png

This can also be done with a club out in front of you but will not give the weighted feel but can give you the rotation feel.  Also notice that I kept my right and left hands the same distance away from my shoulders.  In the backswing the shaft is tilted with the shoulders and the grip is pointing down to the ground.

Screen Shot 2019-03-16 at 4.23.18 PM.png

Screen Shot 2019-03-16 at 4.23.33 PM.png

Screen Shot 2019-03-16 at 4.23.36 PM.png